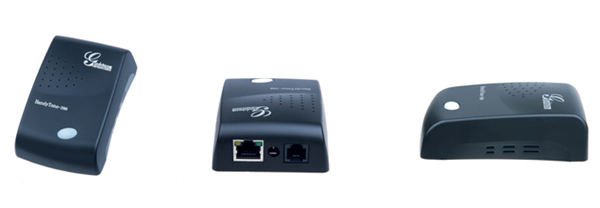
An ATA is usually shaped like a small box and normally has two sets of outlets: one for your VoIP service or LAN and another one for your regular house phone. The main job of ATA is to bridge the analog phone system and the digital network or VoIP service.
The advantages of using an ATA are as follows:
1. You don’t need a computer to use VoIP service.
2. You are able to use VoIP service when you travel by bringing your ATA device. Just plug it in any DSL modem or router and off you go.
3. It’s cheaper than buying an IP phone and easier to configure at the same time.
In the following, I’ll show you how to install an ATA so you can make calls from your house phone at OneSuite VoIP rates. To use OneSuite VoIP service, you need to have a OneSuite account, which gives you OneSuite Broadband Access after you download the free SoftPhone. Or, you can sign up for SuiteAdvantage at $2.95 a month, to also get a phone number plus other features like free voicemail, free incoming calls, message broadcasting, free member calls, caller ID, call block, etc.
I’m using Grandstream HandyTone 286 ATA™ as an example. It’s an entry-level device that is both affordable, popular and has good user reviews.

First, I connect the Ethernet cable from my router to the RJ45 port of the ATA, then my house phone line on the RJ11 port before plugging the device in the wall outlet. Fast forward to configuration settings. I find this ATA really easy to set up on my OneSuite SuiteAdvantage:

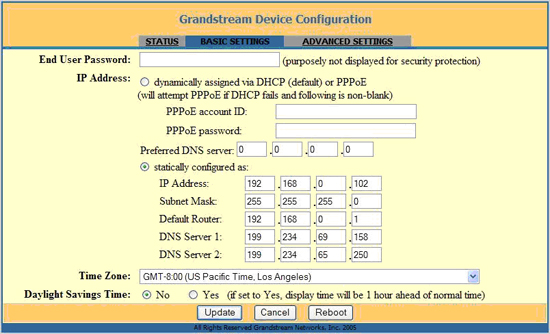
This is the Basic Settings page. If you need a fixed setting then choose the “statically configured as” and enter the following:
IP Address – It’s the IP address of the ATA. To know the IP you need to dial *** and then 02 to hear the current IP address.
Subnet Mask – It’s always 255.255.255.0
Default Router – By default, D-link router IP address is 192.168.0.1 (which is what I’m using) as opposed to Linksys router default IP of 192.168.1.1. Check the documentation of your router to find the default IP.
DNS server 1: DNS server address can be found on the status screen of your router or you can always check with your ISP (Internet Service Provider). DNS server 2: Same as DNS server 1.
Time Zone: Change it to your current time zone. Otherwise, choosing “dynamically assigned via DHCP” will work for most people.

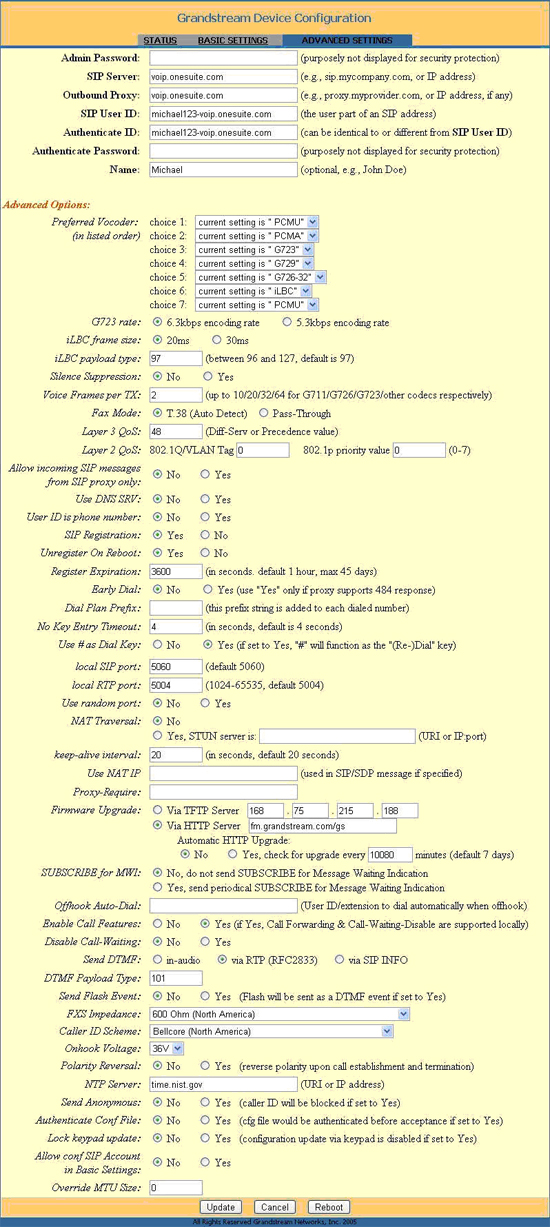
Then proceed to the Advance Settings page:
SIP server: voip.onesuite.com
Outbound Proxy: voip.onesuite.com
SIP user ID: onesuite username-voip.onesuite.com
Authenticate ID: onesuite username-voip.onesuite.com
Authenticate Password: onesuite softphone password Some advance settings highlights:
Preferred Vocoder (Codec): OneSuite supports G711.u, also known as PCMU, so PCMU should be on Choice 1.
User ID is phone number: No. OneSuite doesn’t use SuiteAdvantage number as a username.
SIP Registration: Yes.
Unregister on reboot: Yes. Sometimes the changes won’t take effect if the ATA doesn’t unregister first before rebooting.
Send DTMF: via RTP (RFC2833)
DTMF Payload Type: 101 Click on update then reboot after entering the details.

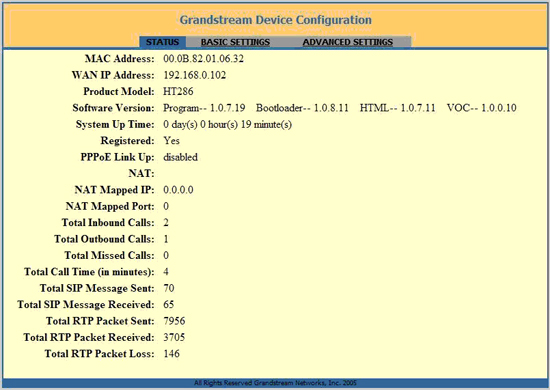
After the reboot, check the status to see if you are registered with OneSuite. If not, then review the details above and make sure everything is configured accordingly. If registered, you are now ready to make OneSuite VoIP calls with ATA. To call a US number, just dial the area code, destination number then press #. For international calls, dial 011, followed by the country code, area code then phone number.

 For people who want to enjoy the benefits and low rates of VoIP calls, but are still attached to traditional phone sets, analog telephone adaptor (ATA) might be the answer for you. Imagine the convenience of making cheap VoIP calls anywhere without a computer, just by plugging the ATA in your router and phone set.


